Wednesday, December 31, 2014
Day 3 of DeNami's Sneak Peeks- Owl Love
Hi Friends,
I am delighted to share with you what I have been working on. I started out just playing with the stamps and then the vision came together and I ended up with this wonderful collection of projects.
I stayed with the Black, Red and White color theme, but gave it lots of dimension, shapes, sizes and texture.
They are all very simple to make. I mainly just used the Versafine Onyx Black ink pad and Tombow markers for all the coloring.
Here's what you will need:
J155 Sweetie Owl Scene (available January 5, 2015)
CR02 Monster Love Clear Stamp Set (I used the tiny heart) (available January 5, 2015)
E162 Love you Forever stamp
B122 Owl with Garland (available January 5, 2015)
C106 Owl Special Delivery (available January 5, 2015)
Versafine Onyx Black ink pad
PC21 White Cardstock
Red Cardstock
PC23 Black cardstock
N109 Polka Dot Border
Ribbon
Med Scallop Oval Punch
Large Scallop Oval Punch
1.5 inch Scallop circle punch
1 1/8 plain circle punch
CB600 Boutique boxes
Tombow markers
Scissors
ATG adhesive
Twine


I started with Black, Red and White Cardstock and stamped it with the new J155 Sweetie Owl Scene.


I stamped several more of the Sweetie Owl Scene to cut them out and add as dimension to the stamping.
I colored with Tombow markers to create the desired look. I always use a lighter marker and then add touches of the darker colors to add dimension and depth.
I made the smaller card and used an oval scallop punch in 2 sizes to create the dimensional frame.


These are perfect for any occasion. You can just use one and give a cupcake to a teacher, friend, neighbor... Or you can do many for parties.
They are very inexpensive to make, but look adorable.


Using an Exacto knife, cut into quarters, then continue cutting, as shown. You will also want to score right along the circle so the cutouts fold nicely.

This shows why you score it and why it is stamped on the back. It has a more finished look.

 You can add colored borders to finish the look. Here I stamped the Polka Dot border in black.

I the put the cupcake and cupcake holder into the Large Boutique box. You can use this box for cupcakes, but also for ornaments, baseballs, a small pot, a candle...
If you like dogs better, you can easily adapt this to dogs, cats, birds, etc.
Enjoy making your version. Thanks for joining in on the Sneak Peek fun!
Please comment what inspired you about this blogpost.
I am delighted to share with you what I have been working on. I started out just playing with the stamps and then the vision came together and I ended up with this wonderful collection of projects.
I stayed with the Black, Red and White color theme, but gave it lots of dimension, shapes, sizes and texture.
They are all very simple to make. I mainly just used the Versafine Onyx Black ink pad and Tombow markers for all the coloring.
Here's what you will need:
J155 Sweetie Owl Scene (available January 5, 2015)
CR02 Monster Love Clear Stamp Set (I used the tiny heart) (available January 5, 2015)
E162 Love you Forever stamp
B122 Owl with Garland (available January 5, 2015)
C106 Owl Special Delivery (available January 5, 2015)
Versafine Onyx Black ink pad
PC21 White Cardstock
Red Cardstock
PC23 Black cardstock
N109 Polka Dot Border
Ribbon
Med Scallop Oval Punch
Large Scallop Oval Punch
1.5 inch Scallop circle punch
1 1/8 plain circle punch
CB600 Boutique boxes
Tombow markers
Scissors
ATG adhesive
Twine
I started with Black, Red and White Cardstock and stamped it with the new J155 Sweetie Owl Scene.
I stamped several more of the Sweetie Owl Scene to cut them out and add as dimension to the stamping.
I colored with Tombow markers to create the desired look. I always use a lighter marker and then add touches of the darker colors to add dimension and depth.
I made the smaller card and used an oval scallop punch in 2 sizes to create the dimensional frame.
For the Banner, I cut black strips of paper. I then cut them to the desired length and folded them in half and cut a point to create a diamond shape. I used white cardstock and using the black cardstock as my guide, I cut out the white cardstock the same angle as the black. I then attached ATG adhesive to the black diamonds and folded them around the red twine.
I then took the cut white cardstock, stamped them, then cut them and placed them on the black banners and cut off the excess.
This is just a mini banner, but you can create ones any size you desire. It really looks adorable. You can do a super mini one and attach it to a card.
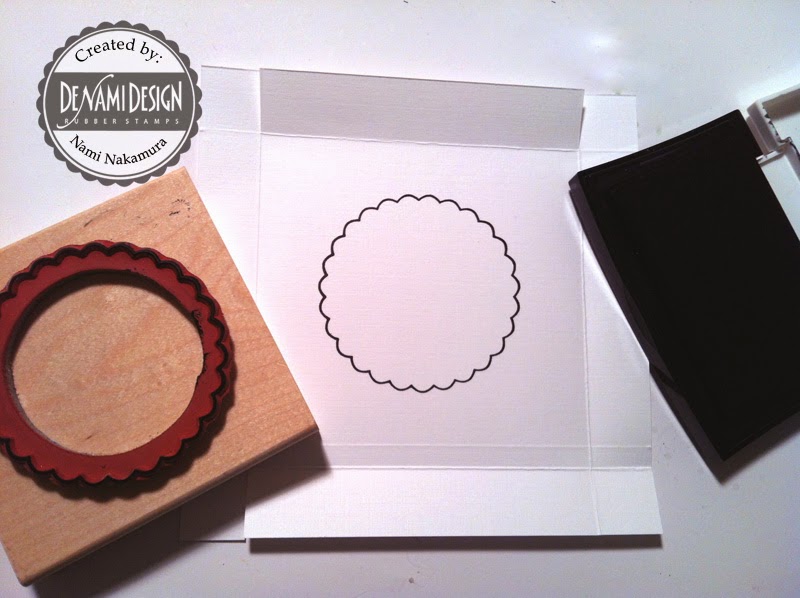
For the cupcake toppers, punch out a 1.5 inch scallop circle or plain circle.Stamp the scallop circle on the white cardstock and punch out with a 1 1/8 inch punch.
Make two for every topper you want to have. Once you punch them out, assemble them using ATG adhesive.
Make two for every topper you want to have. Once you punch them out, assemble them using ATG adhesive.
These are perfect for any occasion. You can just use one and give a cupcake to a teacher, friend, neighbor... Or you can do many for parties.
They are very inexpensive to make, but look adorable.
To make the cupcake holder, cut a cardstock 5.5x5.5 inches. Score .75 inches around.
Cut at scored line until the cross scored line, as shown.

Cut at scored line until the cross scored line, as shown.
Stamp any of the "M" sized DeNami Circle stamps on the back side of the holder.
Using an Exacto knife, cut into quarters, then continue cutting, as shown. You will also want to score right along the circle so the cutouts fold nicely.
This shows why you score it and why it is stamped on the back. It has a more finished look.
You can put a real cupcake there. I didn't have one, so I just used my decorative cupcake to show how it works.
I the put the cupcake and cupcake holder into the Large Boutique box. You can use this box for cupcakes, but also for ornaments, baseballs, a small pot, a candle...
If you like dogs better, you can easily adapt this to dogs, cats, birds, etc.
Enjoy making your version. Thanks for joining in on the Sneak Peek fun!
Please comment what inspired you about this blogpost.
Subscribe to:
Post Comments (Atom)

Follow Us
|
|
|
|
|

9 comments:
This is the sweetest collection! The banner is my favorite!
What an awesome peak at the new images! Love all of the different projects you created! :D
These are such adorable projects and I can't wait to purchase the new owls! It is so exciting because we now have an owl who hangs out by the house hooting all night long. So these owls are perfect for me. It is also fantastic to see Nami doing her own design work for this release. I'm really enjoying all of her creations!!!
I love owls and
these are so cute!
Thanks for all the
ideas.
Carla from Utah
Oh my goodness! I love these new owl images!!! And all of your projects are so super duper sweet!!!
Great collection - especially love that banner!
Amazing projects! I Love Love Love Love Love owls!!! I am going to HAVE to get my hands on these adorable little guys!!
Super cute!
Ohh my goodness...I just LOVE the little owls and your projects are so stinkin' cute!!!
Post a Comment