Showing posts with label Baby. Show all posts
Showing posts with label Baby. Show all posts
Tuesday, May 10, 2016
Mimi Baby Shower Card
Hi Everyone!
Elizabeth
here with another project for DeNami! This week I thought I would pull out one
of my original stamps that I first purchased from her! So I pulled out
Mom-to-be Mimi. I love this stamp because it is great to use for a baby shower
card.
For my card I stamped Mimi in black ink and colored her with
Copic markers. Next, I trimmed her down and found some lavender cardstock that
matched adorable glittery button pattern paper that I found in my stash. I cut
down the button paper to be the front panel of my card. For the base of my card
I decided to to use kraft cardstock instead of the usual white. Also, in my
stash I found some green cardstock that matched the button paper. I cut it into
a banner and thought it would be cute with Petit Four Baby stamp set. I stamped
those in a dye ink that was just a little darker than the paper. I placed Mimi
on the lavender paper and adhered her to the right side of the card and adhered
the banner on the left side of card. I hope that you enjoyed my card this week
and it inspires you to pull out some of those older stamps that you haven't
used in a while!


DeNami Supplies:

Friday, April 11, 2014
Layer It Tutorial by Lisa P
Hello there, DeNami friends! Metallics are really trendy in the crafty world
these days. Today I'm going to show you a fun way to add a touch of gold and/or
silver to your stamping projects.
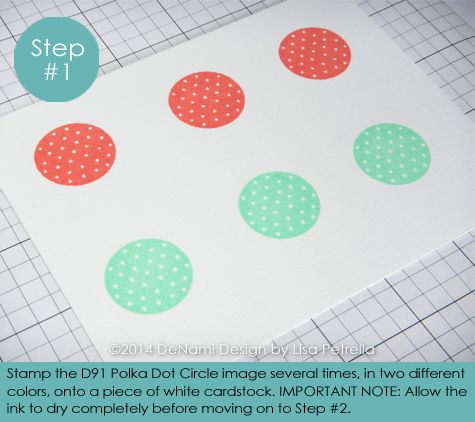
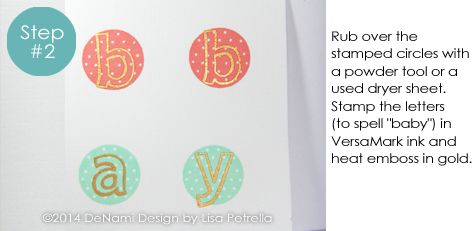
I'm callling this photo tutorial "Layer It" because we're going to layer stamped images and heat embossed images. Let's get started.


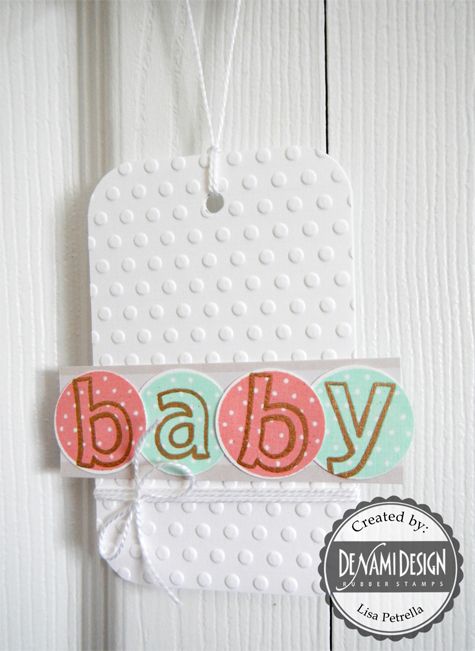
And there you have it! A totally hip and trendy little tag for a baby
gift!
Here's another card I made using this same technique. The Small Solid Square is stamped with dye ink and then the nautical images are heat embossed. I love the added texture of the heat embossing and the shimmer of the silver!


I hope you enjoyed my photo tutorial for today and feel inspired to try layering some stamped and embossed images on your projects! We'd love to see your creations!!!
Have a fabulous day!
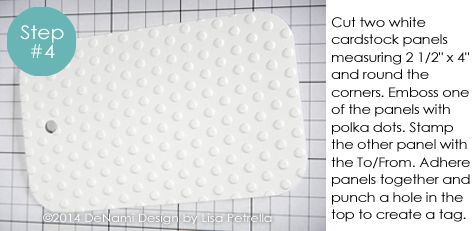
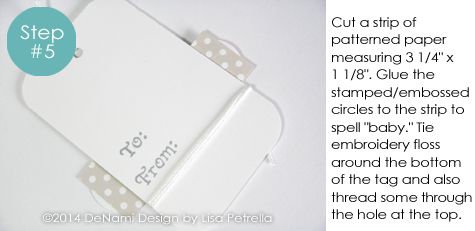
DeNami Supplies: Baby Tag
D91 Polka Dot Circle, TK-VM001 VersaMark Ink, PC21 White Cardstock, MV-01 Marvy 1" Circle Punch, EP02 Gold Embossing Powder
Other Supplies: Baby Tag
Quinn's ABCs (Lawn Fawn), Mint Julep and Fresh Peach Dye Ink (Hero Arts), Bundle of Joy Girl Dots and Stripes 6x6 Paper Pad (Echo Park), Cuttlebug Polka Dots Embossing Folder (Provo Craft), White Embroidery Floss (Janlynn), Crop-A-Dile Corner Chomper (We R Memory Keepers), Hole Punch
DeNami Supplies: Ahoy Card
CL-D90 Small Solid Square, PF40 Nautical Stamp Set, TK-VF019 Deep Lagoon Versafine Ink, TK-VM001 VersaMark Ink, PC21 White Cardstock, Navy Cardstock (no longer available), EP01 Silver Embossing Powder, TW005 Classic Twine 3-pk
Other Supplies: Ahoy Card
Soft Pool and Red Royal Dye Ink (Hero Arts), Clear Embossing Powder (American Crafts), Metropolitan Dots and Stripes 6x6 Paper Pad (Echo Park)

I'm callling this photo tutorial "Layer It" because we're going to layer stamped images and heat embossed images. Let's get started.
Here's another card I made using this same technique. The Small Solid Square is stamped with dye ink and then the nautical images are heat embossed. I love the added texture of the heat embossing and the shimmer of the silver!
I hope you enjoyed my photo tutorial for today and feel inspired to try layering some stamped and embossed images on your projects! We'd love to see your creations!!!
Have a fabulous day!
DeNami Supplies: Baby Tag
D91 Polka Dot Circle, TK-VM001 VersaMark Ink, PC21 White Cardstock, MV-01 Marvy 1" Circle Punch, EP02 Gold Embossing Powder
Other Supplies: Baby Tag
Quinn's ABCs (Lawn Fawn), Mint Julep and Fresh Peach Dye Ink (Hero Arts), Bundle of Joy Girl Dots and Stripes 6x6 Paper Pad (Echo Park), Cuttlebug Polka Dots Embossing Folder (Provo Craft), White Embroidery Floss (Janlynn), Crop-A-Dile Corner Chomper (We R Memory Keepers), Hole Punch
DeNami Supplies: Ahoy Card
CL-D90 Small Solid Square, PF40 Nautical Stamp Set, TK-VF019 Deep Lagoon Versafine Ink, TK-VM001 VersaMark Ink, PC21 White Cardstock, Navy Cardstock (no longer available), EP01 Silver Embossing Powder, TW005 Classic Twine 3-pk
Other Supplies: Ahoy Card
Soft Pool and Red Royal Dye Ink (Hero Arts), Clear Embossing Powder (American Crafts), Metropolitan Dots and Stripes 6x6 Paper Pad (Echo Park)
Monday, April 7, 2014
Noah's Ark
Hello there! It's Lisa P, and it's my turn to share a card here on the DeNami Design Blog!
I absolutely ADORE this little Noah's Ark image and decided to ink it up to make a baby card:

This
single stamp is the perfect size for taking center stage on a card. I
stamped the image onto a die-cut rectangle, colored it with markers and
added some glitter to the ark for a touch of sparkle. I then matted the
stamped panel with a rectangle die-cut from patterned paper and adhered
that to my card base. I tied on some ribbon and ta-da...it's complete.
Super simple!
I
think this image would also be great for making baby shower
invitations, baby announcements, and tags for baby/young kiddo gifts!
Thanks for stopping by!
Have a FABULOUS week!!!
Supplies:
J150 Noah's Ark
Copic Sketch Markers
Spica Glitter Pen: Sand (Too Marker Products Inc)
Patterned Paper: Let's Polka 6x6 Petite Paper Pack (Lawn Fawn)
Dies: Stitched Rectangles (Lil' Inker Designs)
Ribbon: Chevron Twill (Pretty Pink Posh)
Spica Glitter Pen: Sand (Too Marker Products Inc)
Patterned Paper: Let's Polka 6x6 Petite Paper Pack (Lawn Fawn)
Dies: Stitched Rectangles (Lil' Inker Designs)
Ribbon: Chevron Twill (Pretty Pink Posh)
Friday, March 21, 2014
Color Blocking Tutorial by Pattie
I will be starting a new position in my company soon and my co-worker to be
is also a Mom-to-Be! She is expecting a boy and in anticipation of this baby
boy's arrival, I wanted to be ready with my card and gift!

DeNami Design Stamps
Other Products
Cardstock
Paper trimmer/scissors
adhesive
embellishments


I added a crown brad to teddy's head, a sweet gingham ribbon, some metal
baby charms and buttons!
This could easily be done in pink for a girl or even yellow or mint green
for any baby! I think I'll be using this style for my next birthday card too! Let's see
what you come up with!

Monday, May 6, 2013
CARDS Color Challenge
Happy Monday, DeNami friends!
I have some news to share with you all- DeNami is sponsoring this month's CARDS color challenge! We always love getting to work with our friends at this beloved magazine. They never cease to bring beautiful cards to their magazine and blog and we always get excited when our paths connect.
This month, the DeNami sponsored challenge is featuring three colors and boy, are they fun ones! Here's the color palette and my card showcasing them together.


I'm thrilled that just about all of the DeNami DT was able to join along in this color challenge. With all of the different crafting styles, I just know that you'll be inspired by their creations. Here are the links to their blogs:
Oh, I almost forgot to mention that there's a prize pack! Head on over to the CARDS blog for information on the prize and challenge. I hope that you'll be able to join in the fun!

Tuesday, April 30, 2013
Baby Onesie- Two Ways
Good morning, DeNami friends!
Today I'm bringing you the same card in two different color palettes. After all, sometimes you don't know the gender of the baby until after they're born- having both of these cards on hand would be handy!
Last Wednesday, the DT created items for the Product Spotlight Blog Hop, which highlighted the adorable Onesie stamp. With only eight stops and so many cute ideas, you won't want to miss this one. Also, there's a chance you could win this stamp!

First up, I have the boy color palette. I'm such a sucker for the Sky Blue, Celery and Kraft papers individually- together they are even more amazing! There's something so fresh about them.

Next is the girl color palette. Isn't it neat how switching out the colors can change the look of the card? Since I already had the card design and measurements, this card was a breeze to assemble.

I'd love to hear which color combination you enjoyed more- the girl or boy one. I keep on going back and forth, but I think the boy color palette wins be a small margin. *wink*
As always, I'm so happy you stopped by the blog today. I hope you'll join me tomorrow as we have a new Pin-spired post that is jaw dropping amazing. This just might be my favorite one yet!
*I combined both cards into one supply list below*


Thursday, April 25, 2013
Bright Congratulations
Good morning!
I'm not sure if it's just in my circle of friends and acquaintances, but it seems like it's baby season right now. So many adorable cuties being born! Seeing that I tend to struggle with baby cards, I thought there may be a few of you that do too. Today I'm sharing one of my go-to layouts that is great for baby cards, along with other occasions!
I know that baby cards generally get the pastel color palette, so I wanted to break out of that and go bright and bold. If you were to switch out the pink ribbons, you could use this card for either gender!

Tip: this card layout works great with any of our Petit Four sets! Whether you need a chickie, birthday, floral, baby, graduation, or any other occasion in between, this card layout is a great one!

Isn't it fun to go outside the mold and try out different color combinations? Whether you give this color palette a go, or try out this card layout, I hope that today's card inspired you. Thanks for stopping by the DeNami blog. See you tomorrow for a brand new Photo Tutorial by Deb!
NOT LISTED: green, brown, golden cardstocks, golden ink, markers
Subscribe to:
Posts (Atom)

Follow Us
|
|
|
|
|