Showing posts with label halloween card. Show all posts
Showing posts with label halloween card. Show all posts
Wednesday, October 14, 2015
Halloween Shaker Card
Hello Friends,
Shaker cards are fun because they are like a party in a card. Lisa shares how she created this adorable one with the new little chickie trio stamp.
These cards are so special that they are a gift in itself. This idea can easily be used to make a Christmas card, birthday card or any occasion card. Use this idea as a springboard for many of your own ideas.
She writes:
Hello, DeNami Design friends! It’s Lisa P, and today I’m sharing a Halloween shaker card I made with the recently released CL-E193 Jack O’ Lantern Chickie Trio.
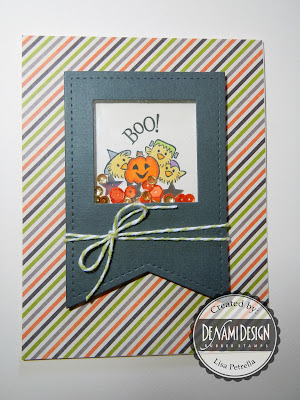
Aren’t those little chickies totally adorable all dressed up in their Halloween costumes?!?! And I couldn’t resist adding a little “Boo!” sentiment to the scene---although these little ones are way too cute to spook, don’t ya think?!?!
For my shaker bits, I used orange and gold sequins and some silver confetti stars. Here’s a closer look:

I hope you like my creation! Thanks for visiting!
DeNami Design Supplies:
Stamps: NEW CL-E193 Jack O’ Lantern Chickie Trio, PF36 Halloween Stamp Set
Ink: TK-VF082 Onyx Black Versafine (Tsukineko)
Cardstock: PC44 Charcoal
Dies: PPPD10 Pretty Pink Posh Stitched Banner Duo (Pretty Pink Posh)
Other Supplies:
Cardstock, Dye Ink, Markers, Patterned Paper, Baker’s Twine, Sequins, Confetti, Clear Window Plastic

Shaker cards are fun because they are like a party in a card. Lisa shares how she created this adorable one with the new little chickie trio stamp.
These cards are so special that they are a gift in itself. This idea can easily be used to make a Christmas card, birthday card or any occasion card. Use this idea as a springboard for many of your own ideas.
She writes:
Hello, DeNami Design friends! It’s Lisa P, and today I’m sharing a Halloween shaker card I made with the recently released CL-E193 Jack O’ Lantern Chickie Trio.

Aren’t those little chickies totally adorable all dressed up in their Halloween costumes?!?! And I couldn’t resist adding a little “Boo!” sentiment to the scene---although these little ones are way too cute to spook, don’t ya think?!?!
For my shaker bits, I used orange and gold sequins and some silver confetti stars. Here’s a closer look:

I hope you like my creation! Thanks for visiting!
DeNami Design Supplies:
Stamps: NEW CL-E193 Jack O’ Lantern Chickie Trio, PF36 Halloween Stamp Set
Ink: TK-VF082 Onyx Black Versafine (Tsukineko)
Cardstock: PC44 Charcoal
Dies: PPPD10 Pretty Pink Posh Stitched Banner Duo (Pretty Pink Posh)
Other Supplies:
Cardstock, Dye Ink, Markers, Patterned Paper, Baker’s Twine, Sequins, Confetti, Clear Window Plastic


Wednesday, October 7, 2015
Dimensional Chickie Halloween Card
Hi Friends,
I have been so amazed with Val's coloring technique on the recent Halloween cards she has been sharing with us. Today her coloring added some pop to the evening look of her Halloween night card.
These fall colors are so fun and festive for this card. All the dimension and glitz really adds a nice touch to the card, making this a gift in itself.
Here is how DT Val created this fun card:
Good morning, Crafters!
I have been so amazed with Val's coloring technique on the recent Halloween cards she has been sharing with us. Today her coloring added some pop to the evening look of her Halloween night card.
These fall colors are so fun and festive for this card. All the dimension and glitz really adds a nice touch to the card, making this a gift in itself.
Here is how DT Val created this fun card:
Good morning, Crafters!
Today I’m featuring 4 stamp sets from DeNami Design in this spooky AND pretty Halloween card!

After
stamping all the images, I used masking paper to cover them up, and
created the sky using Distress Inks. You can use nested dies and decorative papers for the background and layers.

After adding the flowers and the crinkle ribbon, the perfect final touch was adding sequins.

Want
to hear something funny? My husband says the flying witch looks like a
space ship because of the background I created. LOL, I don't know if
that's good or bad!
Thanks for stopping by today, and Happy Crafting!

Friday, October 2, 2015
Fun Treat Boxes for Halloween
Hi Friends,
Who doesn't like yummy treats?! It is even better when it is made with love. The best way to show that love is making it yourself. I always love seeing personal creations and all the imagination and time that went into it.
Today, Lisa created an adorable set of labels that can be used for many purposes. You can attach them to the front of a card for an easy card, or attach to gift tags or lastly, attach to a treat or gift! She was so creative in what she attached these little labels to. Be sure you stick around to find out.
The best part about these labels is that they are simple to make since they don't involve any coloring. All you need is a black ink pad. My fave is always VersaFine available here.
Here's how Lisa did it:
Hi! It’s Lisa P, and today I’m sharing some Halloween labels I made using a combination of brand new and previously released images from DeNami Design. For my project I used the labels to dress up some treat boxes, but you could also use them to decorate gift bags or even turn them into tags with the help of a little bit of twine.

For the mummy label I started with a PC44 Charcoal tag that I die-cut with PPPD09 Pretty Pink Posh Stitched Tags Dies. I stamped the bats from the newly released CL-PF67 Halloween Night in TK-VF082 Onyx Black Versafine Ink. I then stamped the CL-E156 Friendly Mummy twice onto white cardstock, added a tiny bit of color with marker, fussy cut the images out, and adhered them to the tag one on top of the other (using foam adhesive on the top one to add dimension). I then layered the decorated oval tag with an orange die-cut doily.

For the RIP label I started with a golden yellow tag that I die-cut with PPPD09 Pretty Pink Posh Stitched Tags Dies. I stamped the trees and bats from the newly released CL-PF67 Halloween Night in TK-VF082 Onyx Black Versafine Ink. I drew in the line for the ground with a black marker. I then stamped the RIP tombstone twice onto light gray cardstock, fussy cut the images out, and adhered them to the tag one on top of the other (using foam adhesive on the top one to add dimension). I then layered the decorated oval tag with a light gray die-cut doily.

I had so much fun making these labels!!! And the best part was using them to dress up these coffin treat boxes that I made using a template I found online! You can find all of the details by visiting my blog. Here’s how they turned out:

I hope you enjoyed my post for today!
Thanks for visiting!
DeNami Design Supplies:
Stamps: NEW CL-PF67 Halloween Night, CL-E156 Friendly Mummy
Ink: TK-VF082 Onyx Black Versafine (Tsukineko)
Cardstock: PC21 White Cards and PC44 Charcoal Cards
Dies: PPPD09 Pretty Pink Posh Stitched Tags Dies
Adhesive: GL01 Quickie Glue Pen (Sakura)
Other Supplies:
Black Dye Ink, Colored Cardstock, Markers, Dies, Adhesive, MS Coffin Treat Box Template, Patterned Paper, Jute Cord

Who doesn't like yummy treats?! It is even better when it is made with love. The best way to show that love is making it yourself. I always love seeing personal creations and all the imagination and time that went into it.
Today, Lisa created an adorable set of labels that can be used for many purposes. You can attach them to the front of a card for an easy card, or attach to gift tags or lastly, attach to a treat or gift! She was so creative in what she attached these little labels to. Be sure you stick around to find out.
The best part about these labels is that they are simple to make since they don't involve any coloring. All you need is a black ink pad. My fave is always VersaFine available here.
Here's how Lisa did it:
Hi! It’s Lisa P, and today I’m sharing some Halloween labels I made using a combination of brand new and previously released images from DeNami Design. For my project I used the labels to dress up some treat boxes, but you could also use them to decorate gift bags or even turn them into tags with the help of a little bit of twine.

For the mummy label I started with a PC44 Charcoal tag that I die-cut with PPPD09 Pretty Pink Posh Stitched Tags Dies. I stamped the bats from the newly released CL-PF67 Halloween Night in TK-VF082 Onyx Black Versafine Ink. I then stamped the CL-E156 Friendly Mummy twice onto white cardstock, added a tiny bit of color with marker, fussy cut the images out, and adhered them to the tag one on top of the other (using foam adhesive on the top one to add dimension). I then layered the decorated oval tag with an orange die-cut doily.

For the RIP label I started with a golden yellow tag that I die-cut with PPPD09 Pretty Pink Posh Stitched Tags Dies. I stamped the trees and bats from the newly released CL-PF67 Halloween Night in TK-VF082 Onyx Black Versafine Ink. I drew in the line for the ground with a black marker. I then stamped the RIP tombstone twice onto light gray cardstock, fussy cut the images out, and adhered them to the tag one on top of the other (using foam adhesive on the top one to add dimension). I then layered the decorated oval tag with a light gray die-cut doily.

I had so much fun making these labels!!! And the best part was using them to dress up these coffin treat boxes that I made using a template I found online! You can find all of the details by visiting my blog. Here’s how they turned out:

I hope you enjoyed my post for today!
Thanks for visiting!
DeNami Design Supplies:
Stamps: NEW CL-PF67 Halloween Night, CL-E156 Friendly Mummy
Ink: TK-VF082 Onyx Black Versafine (Tsukineko)
Cardstock: PC21 White Cards and PC44 Charcoal Cards
Dies: PPPD09 Pretty Pink Posh Stitched Tags Dies
Adhesive: GL01 Quickie Glue Pen (Sakura)
Other Supplies:
Black Dye Ink, Colored Cardstock, Markers, Dies, Adhesive, MS Coffin Treat Box Template, Patterned Paper, Jute Cord
Monday, September 28, 2015
Halloween Spiders Card
Hi Friends,
It has been chilly in WA these past couple of weeks and it feels like fall is here. One occasion that marks fall is the pumpkin flavored things, colorful leaves and Halloween candy filling the stores. It marks the beginning of holidays to come.
I have had many stampers express that Halloween is a favorite of theirs and enjoy making cards and giving treats to their co-workers, family and friends. Today, Lisa created a clean and simple Halloween card. The best part is that she only used one stamp! This new stamp has the words and picture in one making it a versatile stamp to use for all kinds of projects.
Here is what Lisa writes:
Hello there, DeNami Design friends! It’s Lisa P. Halloween is right around the corner, and I’ve been having lots of fun making Halloween cards and treats for family and friends! Here’s a card I created using the newly released CL-J156 Happy Halloween Spiders.
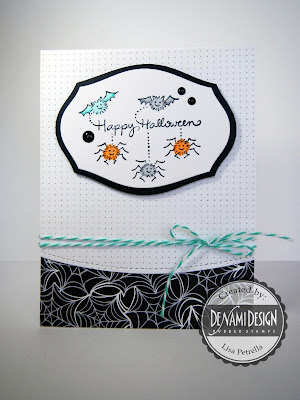
Aren’t those fuzzy little bats and spiders super cute?!?! And since this is all one stamp, it makes creating your Halloween cards quick and simple.
And see the curved/stitched edge on my front panel? That’s one of the borders from the Pretty Pink Posh Stitched Borders 1 set, which is also available at DeNami Design. I love those borders! Such a fun detail!!
Thanks for stopping by! I hope you like my project for today and feel inspired to ink up some Halloween cards this year!
DeNami Design Supplies:
Stamps: NEW CL-J156 Happy Halloween Spiders
Cardstock: PC23 Black Cards
Dies: PPPD04 Pretty Pink Posh Stitched Borders 1 Dies
Other:
Black Dye Ink, White Cardstock, Patterned Paper, Markers, Dies, Baker’s Twine, Embellishments, Adhesive

It has been chilly in WA these past couple of weeks and it feels like fall is here. One occasion that marks fall is the pumpkin flavored things, colorful leaves and Halloween candy filling the stores. It marks the beginning of holidays to come.
I have had many stampers express that Halloween is a favorite of theirs and enjoy making cards and giving treats to their co-workers, family and friends. Today, Lisa created a clean and simple Halloween card. The best part is that she only used one stamp! This new stamp has the words and picture in one making it a versatile stamp to use for all kinds of projects.
Here is what Lisa writes:
Hello there, DeNami Design friends! It’s Lisa P. Halloween is right around the corner, and I’ve been having lots of fun making Halloween cards and treats for family and friends! Here’s a card I created using the newly released CL-J156 Happy Halloween Spiders.

Aren’t those fuzzy little bats and spiders super cute?!?! And since this is all one stamp, it makes creating your Halloween cards quick and simple.
And see the curved/stitched edge on my front panel? That’s one of the borders from the Pretty Pink Posh Stitched Borders 1 set, which is also available at DeNami Design. I love those borders! Such a fun detail!!
Thanks for stopping by! I hope you like my project for today and feel inspired to ink up some Halloween cards this year!
DeNami Design Supplies:
Stamps: NEW CL-J156 Happy Halloween Spiders
Cardstock: PC23 Black Cards
Dies: PPPD04 Pretty Pink Posh Stitched Borders 1 Dies
Other:
Black Dye Ink, White Cardstock, Patterned Paper, Markers, Dies, Baker’s Twine, Embellishments, Adhesive
Tuesday, September 15, 2015
Sneak Peek Week- Day 5 Chickie Halloween and Giveaway!!!

a Rafflecopter giveaway

DeNami products used:
NEW CL-D184 Witchie Chickie
NEW CL-PF67 Halloween Night
F206 Happy Halloween
TK-VF082 Onyx Black Versafine Ink


NEW E193 Jack 'O Lantern Chickie Trio
NEW PF67 Halloween Night Petit Fours Stamp Set
NEW D183 Small Broomstick
NEW K93 Upright Happy Halloween


DeNami products used:
NEW D184 Witchie Chickie
NEW D185 Small House Trio
NEW G167 Arched Happy Halloween
NEW J156 Happy Halloween Spiders
NEW PF67 Halloween Night Petit Fours Stamp Set
N130 Stitched Border
TK-VF082 Versafine Onyx Black ink pad
PC23 Black Cardstock
PC34 Lime Cardstock
PC37 Desert Orange Cardstock
PC45 Amethyst CardstockBe sure to check back tomorrow for Day 6 of Sneak Peek Week and another giveaway!! Thanks for visiting.
Sunday, September 13, 2015
Sneak Peek Week- Day 3 Cute Witchie plus GIVEAWAY!!!

Hi Friends,
Today is Day 3 of the DeNami Sneak Peeks. Hopefully, you are having a great time enjoying these ideas and taking notes about which ones you want to get, maybe all of them!
Once again, we have a fun giveaway. This time for this Bewitched stamp set below. These don't have to be used for Halloween only. the boots can be used to dress up one of our characters, the cauldron can be used as a vase or fishbowl and the hat can be used for a wizard, scarecrow or whatever you can dream up.
You have until Thurs, Sept 17 noon to enter. Winners will be announced on Friday, Sept 18 on the Reveal Day. Be sure to come back tomorrow for another giveaway.
a Rafflecopter giveaway


DeNami products used:
NEW CL-TR31 Bewitched


DeNami products used:
NEW D184 Witchie Chickie
NEW G167 Arched Happy Halloween stamp
NEW PF67Halloween Night stamp set



DeNami products used:
NEW TR31 Bewitched Trifles Stamp Set
NEW K93 Upright Happy Halloween
NEW D183 Small Broomstick
NEW G167 Arched Happy Halloween
D141 Fuzzy Ball
PF54 Animal Faces Petit Fours Stamp Set
PC21 White Cardstock
PC23 Black Cardstock
PC34 Lime Cardstock
PC45 Amethyst Cardstock
Subscribe to:
Posts (Atom)

Follow Us

 |
 |
 |
 |
 |