Showing posts sorted by date for query tree. Sort by relevance Show all posts
Showing posts sorted by date for query tree. Sort by relevance Show all posts
Wednesday, December 2, 2015
Merry Monster Christmas Shaker Card
Hi Friends,
Shaker cards are such a fun. With the fun sparkles and dimension. They are also a gift in itself with the time and preparation that goes into it.
Today, DT Val created a lovely shaker card that you can give those special people in your life. I love the fun and festive colors she used for this card. You can easily change it to pastels or monochromatic blues and silver. We have many cute monsters you can use for this fun card
Read about what she did below.
Shaker cards are such a fun. With the fun sparkles and dimension. They are also a gift in itself with the time and preparation that goes into it.
Today, DT Val created a lovely shaker card that you can give those special people in your life. I love the fun and festive colors she used for this card. You can easily change it to pastels or monochromatic blues and silver. We have many cute monsters you can use for this fun card
Read about what she did below.
~~~~~~~~~~~~~~
Hi Crafters! I have a fun Christmas shaker card for you today!
Hi Crafters! I have a fun Christmas shaker card for you today!
The DeNami Design stamps I'm using are Tall Curly Christmas Tree, Candy Cane Monster, Peppermint Candy Monster, and Flower Patch.

To
make the shaker portion, I pulled out the Pretty Pink Posh Storybook 2
die for the frame; it worked perfectly with the images I had selected! I
filled the shaker portion with clear cupped sequins
4mm & 6mm. The scalloped frame is die cut from the Pretty Pink
Posh Scallop Frames die (gorgeous!).

I used patterned paper for the layers and a Merry Christmas word die cut to add the finishing touches.

Hope this gave you a smile! These little guys always give me one! Thank you for stopping by today, and Happy Crafting!


Monday, November 30, 2015
Festive Christmas Tree Card
Hi Friends,
I hope you had a wonderful Thanksgiving. The end of Thanksgiving seems to mark the Christmas season upon us.
I love Christmas! My favorite part is all the fun and festivities. I like to make time for the simple things such as enjoying activities and making some homespun gifts and cards. I try not to make my cards too complicated so that I can enjoy the process and not stress get the better of me.
Today, DT Lisa created a lovely yet simple card that you can easily create and still have time for the fun of the season. You can change out the colors to suit your preferences such as making it a winter blue with silver accents, or monochromatic in black, grey and white. How about a pastel version? It doesn't take too much to make this all your own.
Hopefully, this will inspire you to begin making your cards.
~~~~~
 To
start, I die-cut two stitched rectangles from white cardstock. Then, I
die-cut the bottom of one of the rectangles with one of the borders from
PPPD04 Pretty Pink Posh Stitched Borders 1. This became my snowy
hillside to “ground” my tree. I lined up the snowy hillside with the
other stitched rectangle and made a small mark with a pencil, so I would
know where to stamp the tree image. I stamped the tree image, colored
it with markers and added some sparkle with a glitter pen. I then
adhered the snowy hillside with foam squares and layered this panel up
with a stitched rectangle die-cut from patterned paper and a blank white
card that was also die-cut with stitching detail.
To
start, I die-cut two stitched rectangles from white cardstock. Then, I
die-cut the bottom of one of the rectangles with one of the borders from
PPPD04 Pretty Pink Posh Stitched Borders 1. This became my snowy
hillside to “ground” my tree. I lined up the snowy hillside with the
other stitched rectangle and made a small mark with a pencil, so I would
know where to stamp the tree image. I stamped the tree image, colored
it with markers and added some sparkle with a glitter pen. I then
adhered the snowy hillside with foam squares and layered this panel up
with a stitched rectangle die-cut from patterned paper and a blank white
card that was also die-cut with stitching detail.


I hope you had a wonderful Thanksgiving. The end of Thanksgiving seems to mark the Christmas season upon us.
I love Christmas! My favorite part is all the fun and festivities. I like to make time for the simple things such as enjoying activities and making some homespun gifts and cards. I try not to make my cards too complicated so that I can enjoy the process and not stress get the better of me.
Today, DT Lisa created a lovely yet simple card that you can easily create and still have time for the fun of the season. You can change out the colors to suit your preferences such as making it a winter blue with silver accents, or monochromatic in black, grey and white. How about a pastel version? It doesn't take too much to make this all your own.
Hopefully, this will inspire you to begin making your cards.
~~~~~
Hi there, DeNami
Design friends! It’s Lisa P. Today I’m sharing a Christmas card that
features the recently released CL-E196 Small Winter Star Tree. I love
this darling little image, and it pairs up so perfectly with the
whimsical fonts of DeNami Design’s holiday sentiment stamps!

The
sentiment was stamped with VersaMark ink onto a die-cut vellum banner,
heat embossed with gold embossing powder, and attached to my focal panel
with a strip of vellum adhesive. To finish, I added a few gold sequins.
Here’s a closer look:

I hope you like my card for today!
Have you started making your holiday cards yet?
Thanks for visiting!
DeNami Design Supplies:
Cardstock: PC21 White Cards
Vellum: PC07 White Vellum
Other Supplies:
Dye Ink, Gold Embossing Powder, Markers, Glitter Pen, Dies, Patterned Paper, Gold Sequins, Adhesive
Wednesday, September 16, 2015
Sneak Peek Week- Day 6 Winter Owls and Tree
Hi Friends,
It's already Day 6 of the Sneak Peek Week. What a fun and eventful it has been. We are just building up to the full reveal.
Today we are focusing on the Winter Owls and Christmas Tree. They are cute and versatile. Check out what our DT's came up with!
Be sure to check back tomorrow for another exciting sneak peek! Stay tuned!
a Rafflecopter giveaway

DeNami products used:
NEW CL-G166 Evergreen Owl Trio
NEW CL-G168 Arched Merry Christmas



DeNami products used:
NEW E196 Small Winter Star Tree
NEW G166 Evergreen Owl Trio
NEW G168 Arched Merry Christmas



DeNami products used:
NEW E196 Small Winter Star Tree
NEW G168 Arched Merry Christmas
NEW K92 Whimsical Cityscape
K48 Sand Waves
K51 Wavy Christmas Script
N137 Teeny Star Background
PC21 White Cardstock
PF02 Classic Christmas Petit Fours Stamp Set
GL01 Quickie Glue Pen
SS01 Blue Ice Glitter
TK-VF083 Smoky Gray Versafine Ink Pad
TK-VG037 Versamagic Sea Breeze Ink Pad
NEW E196 Small Winter Star Tree
NEW G168 Arched Merry Christmas
NEW K92 Whimsical Cityscape
K48 Sand Waves
K51 Wavy Christmas Script
N137 Teeny Star Background
PC21 White Cardstock
PF02 Classic Christmas Petit Fours Stamp Set
GL01 Quickie Glue Pen
SS01 Blue Ice Glitter
TK-VF083 Smoky Gray Versafine Ink Pad
TK-VG037 Versamagic Sea Breeze Ink Pad
Thursday, March 5, 2015
Get Well and Sympathy Cards
Hi DeNami friends,
Lately, I have heard of so many people going through some rough waters. We feel helpless, but want to share our love and prayers with them. As stampers, the best way we know how is to express that love through our art in cards. The love and care that goes into cards can be felt by the recipient.
Today, Lisa shares some lovely cards you can make for those you care about. They can be used for Get Well or Sympathy cards. You can change out the colors to suit the person you give it to, but these are great go-to cards for these times.
Lisa writes:
Hello, DeNami Design friends! It’s Lisa P. here. Does anyone else struggle when trying to create sympathy cards? I sure do. For me, they are the most difficult cards to make. Today I’m sharing three sympathy cards that feature a couple of the sentiments from the newly released CR04 Heartfelt Blessings Stamp Set. These gorgeous hand-lettered sentiments pair up beautifully with many of DeNami Design’s images and are perfect for sending thoughts, prayers and strength to anyone who is going through a tough time.
Today, Lisa shares some lovely cards you can make for those you care about. They can be used for Get Well or Sympathy cards. You can change out the colors to suit the person you give it to, but these are great go-to cards for these times.
Lisa writes:
Hello, DeNami Design friends! It’s Lisa P. here. Does anyone else struggle when trying to create sympathy cards? I sure do. For me, they are the most difficult cards to make. Today I’m sharing three sympathy cards that feature a couple of the sentiments from the newly released CR04 Heartfelt Blessings Stamp Set. These gorgeous hand-lettered sentiments pair up beautifully with many of DeNami Design’s images and are perfect for sending thoughts, prayers and strength to anyone who is going through a tough time.


I hope you like my creations for today!
Thanks for stopping by!
DeNami Design Supplies:
Stamps: CR04 Heartfelt Blessings, CL-F239 Cross and Vines, PF37 Elegant Floral Stamp Set, CL-GD001 Fancy Flutters, F182 Round Leafy Tree
Twine: TW003 Spring Twine 3-pk
Other Supplies:
Markers: Assorted Copic Sketch Markers
Glitter Pen: Clear Wink Of Stella (Zig)
Cardstock: Lemon Tart and Aqua Mist (Papertrey Ink)
Dies: Nesting Card Templates (Lifestyle Crafts), Medium Scalloped Border
(Papertrey Ink), Stitched Rectangles (Lil’ Inker Designs)
Punch: Doily Lace Edge Punch (Martha Stewart Crafts)
Button Twine: Rustic Jute (Papertrey Ink)
Embroidery Floss: White (Janlynn)
Sequins: Caribbean Blend (Avery Elle)
Tool: Crop-A-Dile Corner Chomper (We R Memory Keepers)
Adhesive: Adhesive Tape Runner (Tombow), 3D Foam Tabs (Tombow), Scor-Tape
(Scor-Pal), Matte Multi-Medium (Claudine Hellmuth)
Wednesday, December 17, 2014
Sweet Lollipop Delights
Hi Friends,
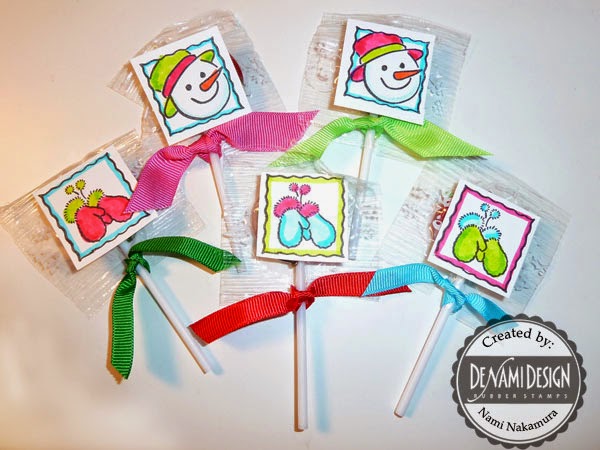
How is your Christmas shopping coming along? If you are looking for a super cute, yet inexpensive gift, then this might just be it! I made these for a little kids group I volunteer at. I bought the lollipops at the Dollar Tree. There were about 20 in a bag for $1!
They are very easy to make.
Supplies:
TR05 Winter Blocks Trifles set. I used the Snowman block and Mittens from the set.
Onyx Black Versafine Ink Pad, but use Tuxedo Black Memento if you use Copics
Tombow markers or any water based ones if using Versafine. Use Copics with Memento
Lollipops (flat ones work best)
Ribbons of various colors
Scissors
PC21 White Cardstock.. I love it best!
ATG Adhesive Tape using ATG Applicator
Directions:
1) Stamp the snowman and mittens on the cardstock to fill a sheet using Versafine or Memento.
2) Color in with markers
3) Cut them out.
4) Using ATG adhesive, attach to lollipops
5) Use scissors to cut slits next to stick so you can tie the ribbon close to the candy.
6) Cut out ribbons to 4 inch length or as desired
This is Step #1

This is Step #2



How is your Christmas shopping coming along? If you are looking for a super cute, yet inexpensive gift, then this might just be it! I made these for a little kids group I volunteer at. I bought the lollipops at the Dollar Tree. There were about 20 in a bag for $1!
They are very easy to make.
Supplies:
TR05 Winter Blocks Trifles set. I used the Snowman block and Mittens from the set.
Onyx Black Versafine Ink Pad, but use Tuxedo Black Memento if you use Copics
Tombow markers or any water based ones if using Versafine. Use Copics with Memento
Lollipops (flat ones work best)
Ribbons of various colors
Scissors
PC21 White Cardstock.. I love it best!
ATG Adhesive Tape using ATG Applicator
Directions:
1) Stamp the snowman and mittens on the cardstock to fill a sheet using Versafine or Memento.
2) Color in with markers
3) Cut them out.
4) Using ATG adhesive, attach to lollipops
5) Use scissors to cut slits next to stick so you can tie the ribbon close to the candy.
6) Cut out ribbons to 4 inch length or as desired
This is Step #1
This is Step #2
Here is the final product!
Here is an army of snowmen!
These will make anyone smile. Spread the joy and have fun giving!
See you next time!
Tuesday, December 2, 2014
Winter Branch Card Ideas (Guest Post)
Hi Friends,
We have a special treat today! I have asked my friend, Tina, to write a special blogpost for you all. She is founder and writer for The DeNami Addict blog.
Not only is she a great friend of DeNami, but she has many creative ideas to share. She took the J149 Winter Branch and showed the versatility in it. Each project looks different than the other, but all equally lovely.
Let's let Tina explain it in her own words:
We have a special treat today! I have asked my friend, Tina, to write a special blogpost for you all. She is founder and writer for The DeNami Addict blog.
Not only is she a great friend of DeNami, but she has many creative ideas to share. She took the J149 Winter Branch and showed the versatility in it. Each project looks different than the other, but all equally lovely.
Let's let Tina explain it in her own words:
Today I want to show you a fun new way
that you may not have thought of to use the DeNami Winter Branch.
First let me show you what I made this
past week...


I know what you're thinking, but no, it's
not the Winter Tree or the Simple Tree. Those are much larger and you could never fit three across on a
standard A2 sized card. This is the Winter Branch just turned up on it's end. I stamped it
at various heights then using 3 marker colors - gold, maroon & light green
- I simply added dots for the leaves. I added a scalloped panel with a length
of ribbon to hide the ends of the branches and there you go, an easy peasy fall
themed card.
Stamps Used:
Now like I was mentioning earlier, this
little branch can be changed up for soooo many different looks!
Here's a couple of ideas that that I was
playing around with after making my card -

For the one on the far left I simply added
the fir sprig in a dark green then using 2 lighter greens stamped over a
few of the fir sprigs here and there to add contrast. For the other one I added
a few sparse fir sprigs then hung some ornaments from it. Since I was just
playing around my stamping isn't as good as it would be on a finished card but
you get the gist of what I was trying to accomplish. For the one on the right I
would firstly stamp the Winter Branch then stamp the ornaments. I'd stamp the
ornaments again on a post it note or other thin scrap and cut them out for a
mask before stamping the fir sprigs.
Stamps Used:
Here's two other cards that I made ages
ago using this little branch -


By just using a little selective inking I
made a simple little branch. Isn't perfect perch for a little tweety bird? *There is a stamp with two Tweety birds
holding a heart called E125 Tweety
Birds with Heart, however, I don't happen to own that stamp. So, being a
genius on that particular day, I improvised and used the Single Tweety Bird,
Mini Heart and inked up just one bird from the Tweety Bird Border and made my
own ;)
Stamps Used:
Friday, May 2, 2014
Colored Vellumn Tutorial by Lisa E.

DeNami Products
Elegant Autumn Scene
White Cardstock
Leaf Green Cardstock
Birch Tree Embossing Folder
Quickie Glue Pen
Champagne Rhinestones
Elegant Autumn Scene
White Cardstock
Leaf Green Cardstock
Birch Tree Embossing Folder
Quickie Glue Pen
Champagne Rhinestones
Other Products
Zing white embossing powder
Zots Glue Dots
Simply Chartreuse dye ink
Ripe Avocado dye ink
Zing white embossing powder
Zots Glue Dots
Simply Chartreuse dye ink
Ripe Avocado dye ink
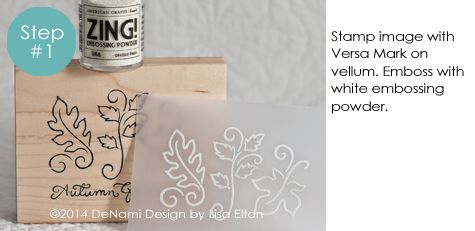
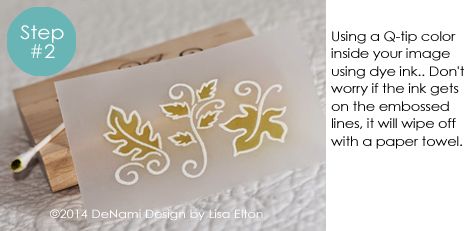
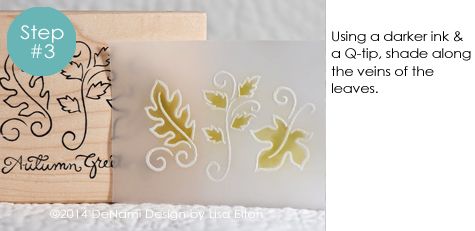
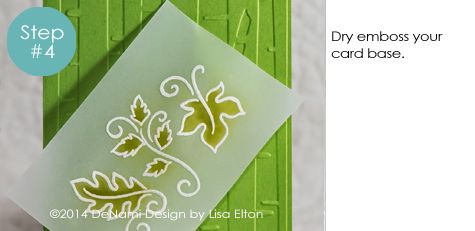
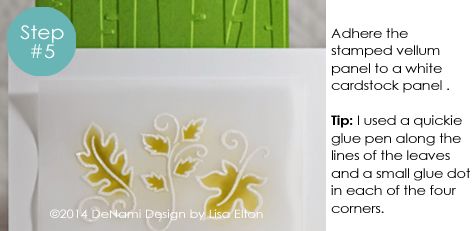

Tip: Place a rhinestone over the four glue dots to hide them!

Want to see more of our Photo Tutorials? If you have missed any of them, CLICK HERE. Whether you need some inspiration, want to learn new techniques or just
need a refresher course in crafting, this is the perfect resource.

Tuesday, February 4, 2014
A Tree Full of Thanks
Greetings Denami friends!
It's Dana here today to share with you a simple Thank You card.

I
love using embossing folders because they give an extra ooomph with no
real effort. They also come in so many designs that it's possible to
match the pattern with stamps that Denami carries easily.
For instance, the Woodgrain embossing folder is perfect paired with any of Denami's tree images, as you can see above.
I used the Large Winter Tree stamped in soft brown and added yellow leaves using the triple leaf image in the Classic Leaves set. Some buttons, twine, and paper piercing finished it off.

If
you stop there, your sentiment can be added for almost any occasion as
needed. This would make a great masculine Birthday or Congratulations
card! Because I needed a thank you card, I chose the Brushed Thank You stamp. Right at the very end, I used a glitter pen to draw a tiny line at the bottom of each leaf!
I hope you feel inspired and try pairing some embossing folders with your stamps soon:) Thanks for stopping by,

Friday, December 6, 2013
Take 3: Medium Pine
Hello! It's Lisa P. here sharing a concept I call "Take Three," which involves
using a selected stamp to create cards in three different styles for three
different occasions. Today I'm focusing on the I20 Medium Pine stamp.
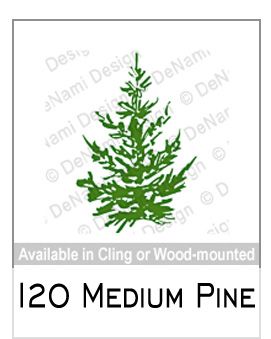
I originally picked up this stamp to create Christmas cards, and you can find this stamp categorized under "Christmas" in the DeNami Design store. So, for my first example today, here's a clean and simple holiday card.

I embossed the I20 Medium Pine in white onto a kraft
cardstock panel, which gives it a wintery look. I also embossed the star on top,
which is actually one of the stars from I40 Moon & Stars (pretty handy!). I
drew the hills onto vellum strips, cut them out, and erased the pencil lines. I
then stamped the sentiment in red ink onto the bottom of one of the vellum
strips and embossed it with clear embossing powder. I attached the hills to the
panel with vellum adhesive, tied on some jute rope for a rustic touch, and
adhered the completed panel to the card front with foam squares.
I think these would make wonderful holiday cards and would be easy to mass-produce. They may require a little extra postage though due to the rope and raised panel (so you'd want to check with your local post office before putting them in the mail).
Now...time to think outside of the "Christmas" box with the I20 Medium Pine stamp. Next up I've created a one-layer, all-occasion notecard.

This card literally
took just minutes to make, and it's perfect for any occasion. I simply stamped
the I20 Medium Pine repeatedly in two different shades of green ink,
varying the height of the stamp to create interest. Then, I chose a sentiment
from my stash and added it just above the trees. How fun would it be to create a
set of these, tie them up with twine, hemp cord or ribbon, and give them to a
friend, neighbor, or co-worker?!?! I always love having simple notecards like
this on hand, and I'm sure others do too!
For my third take on the I20 Medium Pine stamp, I've used the image to build a scene. And what could be more ideal than a forest for Chickie In A Tent to camp out in?!?!

I stamped the tree image in two different shades of green ink (just like I did on the previous card) only this time I left room at the bottom for the "ground." Then, I stamped Chickie In A Tent and added a shooting star and the sentiment above him. I added color with markers and a touch of glitter to the star. I think this would make a super fun birthday card for someone who loves the great outdoors!
Well, thanks for checking out my "Take Three" post today! I hope I've inspired you!
Have a FABULOUS weekend!!!

"Holiday Cheer" Card:
Stamps: I20 Medium Pine, TR07 Holiday Greetings Stamp Set, I40 Moon & Stars
Ink: TK-VM001 VersaMark, TK-VF010 Satin Red Versafine
Embossing Powder: EP06 White, Clear (American Crafts)
Cardstock: PC21 White and Brown Kraft (DeNami Design)
Vellum: (DeNami Design)
Fibers: Jute Rope (Canvas Corp)
Vellum Adhesive: (Tombow)
Tool: Stamp-A-Ma-Jig (EK Success)
"Just A Note" Card:
Stamps: I20 Medium Pine, TR16 All Occasion Sentiments Stamp Set
Ink: Pistachio, Olive Grove, Espresso Truffle Memento (Tsukineko)
Cardstock: Brown Kraft (DeNami Design)
Tool: Stamp-A-Ma-Jig (EK Success)
"Make A Wish" Card:
Stamps: I20 Medium Pine, E170 Chickie In A Tent, PF47 Outer Space Stamp Set, F156 Make A Wish
Ink: TK-ME900 Tuxedo Black, Pistachio, Olive Grove, Teal Zeal Memento (Tsukineko)
Copic Sketch Markers
Cardstock: PC21 White, Charcoal, Brown Kraft (DeNami Design)
Tools: Edge Distresser (Heidi Swapp), Stamp-A-Ma-Jig (EK Success)
atyou Spica Glitter Pen: Clear (Too Marker Products Inc)
Fibers: Natural Hemp Cord (Hemptique)
Monday, December 2, 2013
Christmas Sale + Winter Wonderland

Hello!
My card for today uses lots of DeNami Design goodies! Some a little older and some brand new.


NOT LISTED: light aqua and grey ink, light grey cardstock
And there you have it! Your very own winter wonderland! I hope you liked my creation for today! Thanks for stopping by!
Subscribe to:
Posts (Atom)

Follow Us

 |
 |
 |
 |
 |