
Showing posts with label denami sneak peek week. Show all posts
Showing posts with label denami sneak peek week. Show all posts
Friday, October 28, 2016
Reveal Day Projects- Owl Friends
Hi Friends,
Thanks for following along our week of sneak peeks. It was fun to share what we have been working on behind the scenes. With there being so many stamps, I didn't get a chance to showcase the new owl stamps we have.
Here is a grouping of projects that features new owl stamps. I used the Pretty Pink Posh dies that are available from DeNami in the projects.

This blue card used the filmstrip die to create frames to stamps a different scene. I used the same C133 Owl Moon and Stars for all three frames. I stamped him in different angles and parts of the frame so they didn't look identical. Makes it more interesting. I also stamped the polka dotted background using N133 Polka Dot Background.

The film strip die I used is found HERE. I stamped the images in the TK-VF082 Versafine Onyx Black inkpad. I then colored the images using Tombow markers.

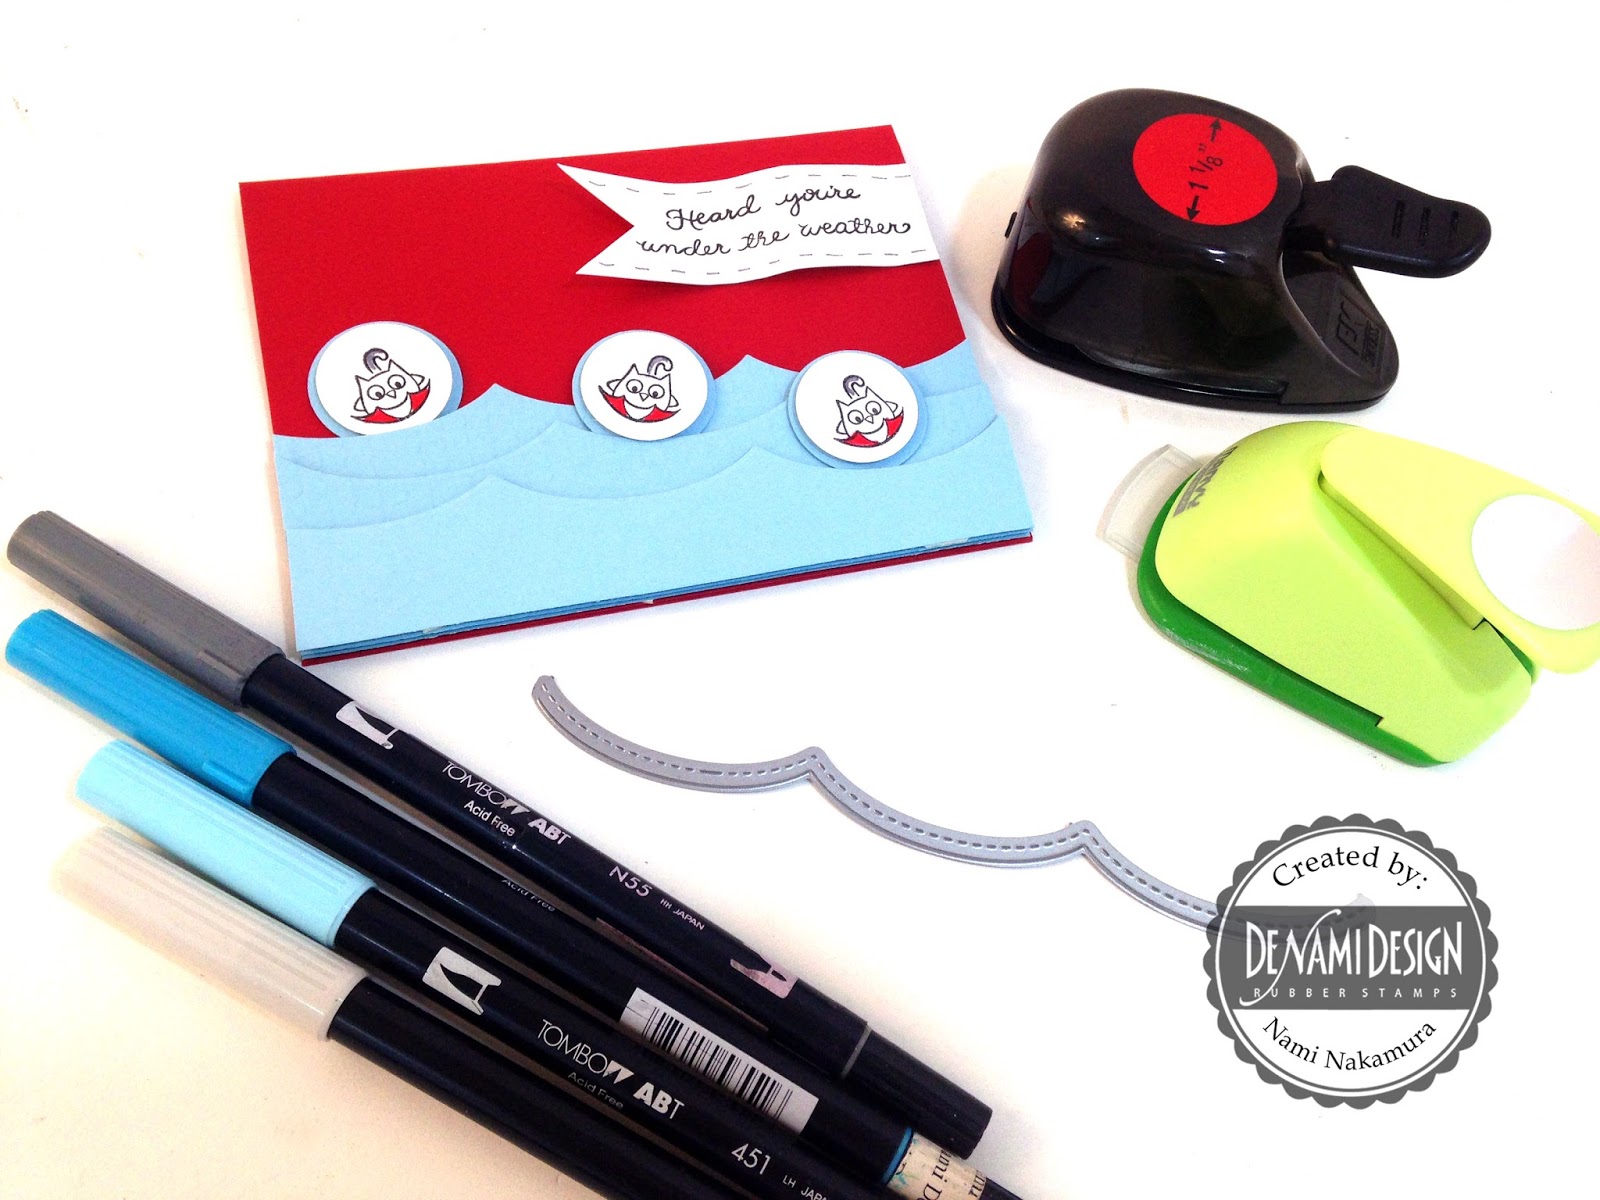
This next one is so cute. I used the PPPD26 Pretty Pink Posh large scallop border die to create these "waves". They are available from DeNami. I used a one inch and a one and 1/8 inch circle punch to create these little circles. I used foam mounting tape so they will have dimension and pop out from the card and waves. I created my own little banner using a paper trimmer and scissors. I curved the banner so it looked like it was waving in the air. I love the bold colors in this card and bold shapes.

You can see the wavy banner from this angle in this pic.
In the next pic you can see the Treasure Chest box template that is available for download. A single Hershey Nugget fits in it. Also, a Hershey's Kiss or a single Rolo candy also fits. Perfect for a tiny little party favor. I stamped the N133 Polka Dot Background after I cut out the template.

Aren't these projects fun and adorable? These are easy enough to use for all kinds of occasions, like birthdays, showers, everyday, get well and more.

I hope you have enjoyed following along all week. Be sure to leave a comment on each of the Sneak Peek posts to be entered to win in one of many giveaways. You have until Sunday, Oct 30 to enter.
Note: We have a special Reveal Day coupon if you order today ONLY. You get a free gift with any size order. Use coupon code MYSTERYGIFT16 at checkout.
Note: We have a special Reveal Day coupon if you order today ONLY. You get a free gift with any size order. Use coupon code MYSTERYGIFT16 at checkout.
You can find all the new stamps HERE.

Reveal Day! Free Gift- Today ONLY!

Today is Reveal Day! Woo Hoo! You will find all the new stamps HERE.
Leave a comment below and on each of the Sneak Peek's posts to be entered into one of many giveaways. You have until Sunday, October 30 to enter. Winners will be announced the following week.
I am working on a special Reveal Day post, but will post later... stay tuned.

Thursday, October 27, 2016
Sneak Peek Week Day 5- Warm Wishes
Sneak Peek Week Day 5- Warm Wishes

Hello Friends,
I hope you have been having a fun time following the sneak peeks for this season. It has been fun unveiling the cute stamps that will make you smile.
Today's theme is Warm Wishes. It is a theme you can use through the entire Christmas and winter season. You can add any of the Christmas images to make it into a Christmas theme. As always, all our stamps go great together.
Here is the group of projects I made for this theme. I love the whimsical feel of this collection.


Here is the first card. I stamped the Winter Wishes stamp set as a background using the Smoky Grey Versafine ink pad. It was a softer look than my usual black.

Tilting the images created a more random feel than used stamping it straight. I then used VersaMagic Sea Breeze pad with the snowflake that is in the PF75 Christmas Joys Petit Fours stamp set.

This next one has lots of layers. I used the Smoky Grey Versafine again to create this muted look. I stamped the polka dotted background using VersaMagic Sea Breeze available from DeNami HERE.
VersaMagic is a great pad for making soft backgrounds. It is a go-to pad for me when I want to make my own backgrounds. The polka dotted background I used is N136 Medium Polka Dots.

Isn't this a lovely blend of soft colors with a pop of color? This color combo remind me of hot cocoa or chocolate and raspberries, doesn't it?

The last project is a pillow box made from DeNami's downloadable template. I stamped the N133 Polka Dot Background in the Smoky Grey Versafine Inkpad.
I printed the template, cut it out and then scored at the fold lines and just assembled. I used ATG to seal the seam, available from DeNami HERE.

I hope you enjoyed today's installment. Tomorrow is the big reveal! Be sure to comment on each of the day's posts to be entered into several giveaways. You will have until Sunday, October 30 to enter.
Come back tomorrow to see the rest of the stamps!
By the way, we have a Facebook event with the Sneak Peek Week featured. You can join us HERE.
Thanks for stopping by!

Tuesday, October 25, 2016
Sneak Peek Week Day 3- Fall Fun
Sneak Peek Week Day 3- Fall Fun

Hello DeNami Friends,
Welcome do Day 3 of Sneak Peek Week! Today we are sharing some fun fall card ideas that you can use and enjoy.
Here is the group pic I took of all the matching projects. I love the rich and fun colors here.
Welcome do Day 3 of Sneak Peek Week! Today we are sharing some fun fall card ideas that you can use and enjoy.
Here is the group pic I took of all the matching projects. I love the rich and fun colors here.

Here is the brown card up close

Here is the orange card up close

Here is the pillow box up close. You can get it on the DeNami site as a downloadable template.
The great thing about this pillow box is it fits a gift card perfectly.
The great thing about this pillow box is it fits a gift card perfectly.

Look how lovely they look together. The new circle Fall Greetings circle stamp is perfect for all kinds of projects. You can even use it to decorate wrapping paper.

Here is a process pic. I love the solid falling leaves stamps. They are a classic collection that work perfectly with any of the DeNami stamps.

Be sure to leave a comment to be entered into the several giveaways we have! If you missed the previous days' posts, be sure to go back and leave comments there, too. Come back tomorrow for Day 4 of Sneak Peek Week. Thanks for stopping by!


DeNami Supplies:
F267 Mini Circle Fall Greetings
F267 Mini Circle Fall Greetings
Sunday, October 23, 2016
Sneak Peek Week Begins Today! Spooky Fun (Day 1)
Sneak Peek Week Starts Today! Get Ready for Spooky Fun!!


Hello DeNami Friends!
I'm excited to unveil some fun and whimsical stamps all this week! Today we start of with the Spooky Fun theme. These fun Halloween stamps are perfect for this season. They are very versatile and will go well with any of DeNami's past collections.
This first pic is of the grouping of cards I did. They are similar yet different at the same time. I love how you can take these layouts and change them up to fit any occasion. I used the new Petit Fours Halloween Friends set for much of the accents.
Below I highlighted some of the techniques and supplies I used.

Here is the purple one up close. I used the Teeny Star Background stamp with the white Versamagic inkpad to cover the background.

This next card I used the Teeny Star to create my own background using the Versafine Onyx Black inkpad. I also punched out the scallop circles on the red cardstock and placed a white panel behind it and stamped the F268 Mini Circle Happy Halloween inside it.

This next card is on the Desert Orange cardstock. I stamped the smiling candy corn from the PF77 Halloween Friends stamp set in Versafine Onyx Black inkpad. I then colored it in and used the Quickie Glue pen with the Citrone Sparkletts Glitter to create this shiny look.


As you can see, it doesn't take a lot of supplies to create these cards. This pic is a sample of some supplies I used to create these cards. I hope it inspires you to create fun and happy cards!

Be sure to come back tomorrow for more card ideas.
Also, be sure to comment each day to be entered to win one sets of stamps that we will be giving out!
The new collection will be available for purchase on this Friday, Oct 28.
See you tomorrow!

DeNami Supplies:
SS16 Sparkletts Citrone GlitterMonday, January 5, 2015
DeNami's New Release Day!!!
Hi Friends,
If you have been following my posts you will know that today is the big reveal!
You will be able to purchase all 53 of the new designs. There are 39 designs in all 4 new Clear Stamp Sets and 14 new individual ones. The individual ones are available wood mounted or cling.
You can buy them all in this bundle pack here. You can download our new supplement here and also get our checklists here.
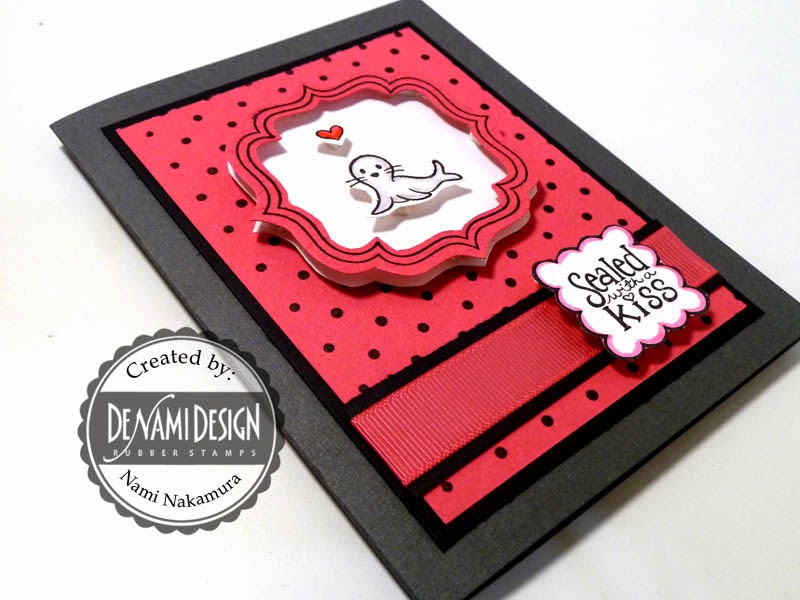
I still have more ideas that I wanted to showcase. Here's what I came up with.


 Notice the reverse image? I did a pic below on how I did this. I only used the one seal stamp.


Be sure to LIKE us on Facebook here. We are also on Instagram and Pinterest.
Nami
You will be able to purchase all 53 of the new designs. There are 39 designs in all 4 new Clear Stamp Sets and 14 new individual ones. The individual ones are available wood mounted or cling.
You can buy them all in this bundle pack here. You can download our new supplement here and also get our checklists here.
I still have more ideas that I wanted to showcase. Here's what I came up with.
Here's the supplies you'll need:
Ribbon
Square scallop punch
Scissors
Xacto knife
I used a scallop square punch to create these openings. You can use a die for this if you have it.
I used foam mounting tape to give dimension to these little seals.
Look at the dimension you can accomplish. I used 2 layers of mounting tape to the frame and the seal and heart.
To create a continuos background, stamp it on the one side, then get at eye level to the rubber and match up the pattern to continue it. You can get pretty good by practicing.
Look! You can't even tell where the pattern starts or stops.
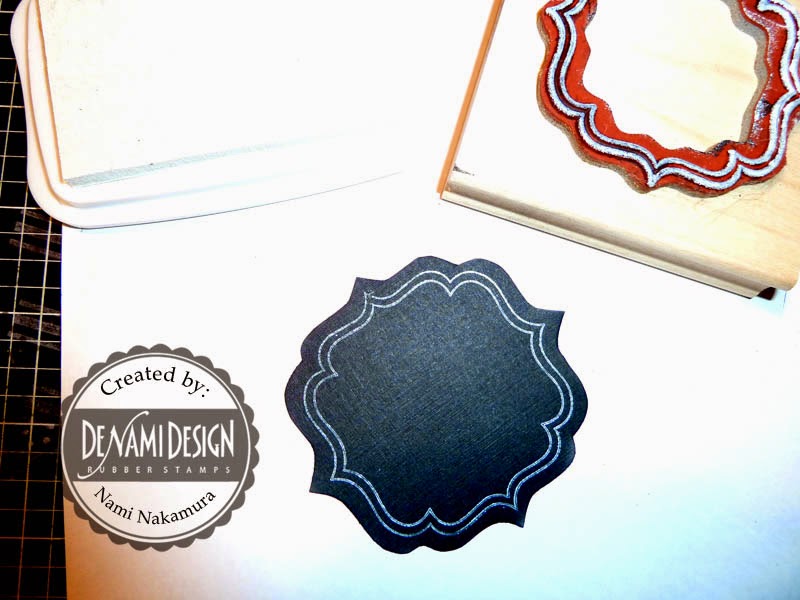
For the dimensional frame. Stamp the Elegant Square Frame on a colored cardstock and cut out with scissors
Cut out the opening with an Xacto knife.
Add a tiny dot of adhesive to hold to the white cardstock and cut around the frame with scissors.
Use mounting tape to give dimension to the frame. Here I used 2 layers of mounting tape to make it really pop out.
Here I used the Cloud White VersaMagic to create the same kind of frame.
Cut out and then cut out the inside.
The Xacto is quite accurate.
To create the plaid strip, cut out a strip of Black cardstock. Using Cloud White VersaMagic, stamp the N128 Three Line border diagonally on one corner, then line up the wood block to the stripe and continue all the way across. Repeat going the opposite direction creating a plaid pattern.
I used my solid square and stamped the seal on it and then stamped the square on my card. This created a reverse image.
To see all the new designs, you can click here.
Be sure to LIKE us on Facebook here. We are also on Instagram and Pinterest.
You can also receive our email newsletter with sales and updates. Sign up here.
Thanks so much for following us along. I will be posting more projects soon. Please share your projects with the new designs with me. Can't wait to see what you come up with.
Nami
Subscribe to:
Posts (Atom)

Follow Us
|
|
|
|
|


