
Showing posts with label Monster celebration. Show all posts
Showing posts with label Monster celebration. Show all posts
Friday, July 15, 2016
Happy Monster Birthday Card- Guest Designer
We welcome back Anika Lerche for another cute and fun card. She created this adorable birthday card using the monster and balloon stamp. This is great for sending cheer or any kind of celebration.
She was so clever to make a bouquet of balloons with the one balloon that is on the stamp itself. So creative! You can also just create a balloon bouquet for any other kind of cards separately. The possibilities are endless.
We are so delighted to have featured Anika with us. Be sure to subscribe so you don't miss any of our guest posts. You never know who will be next.

- I stamped the monster onto Copic friendly paper, masked it with a post it note and stamped some additional balloons. After that I colored the image with Copics.
- I masked the monster once gain, this time with masking fluid and added some inkblending to the background to create a sky.
- I stamped the sentiment with Versafine.
- I die cute the square from that piece of paper, added a layer of kraft cardstock.
- To the cardbase I adhered a piece of patterned paper an assembled the card.


Friday, July 8, 2016
Monster Car Card- Guest Designer
Hi DeNami Friends,
Anika Lerche returns for a whimsical and fun card using the monster in car stamp. They are doing a little joy ride and sharing the joy here.
The card is simple, but the colors are exquisite. This card would be easy to make into a birthday or celebration card just by changing the sentiment and adding a bouquet of balloons to the car.
These little monsters are busy and have many fun activities. You can add to your collection to use for any and all occasions.
She will be returning next Friday for another card surprise. Be sure to check back.
Thanks for stopping by!


The card is simple, but the colors are exquisite. This card would be easy to make into a birthday or celebration card just by changing the sentiment and adding a bouquet of balloons to the car.
These little monsters are busy and have many fun activities. You can add to your collection to use for any and all occasions.
She will be returning next Friday for another card surprise. Be sure to check back.
Thanks for stopping by!

- I took a piece of white cardstock and added some ink blending. I splattered some water on it to get the droplets effect and cut it it down a little bit more narrow than my card base.
- For the image I chose to go for no line coloring: I stamped the image in a light ink and colored them with colored pencils. I adhered the monsters in the car with a action Whobbler to the card panel.
- I adhered some patterned paper with black and white stripes to the card base and added the card panel.
Friday, June 24, 2016
Hello Chickie Tags- Guest Designer
Hello DeNami Friends,
Today we have a special guest from Germany, Anika Lerche. She is an avid card maker and creator. You will see she has a keen eye for color and design. She uses many mediums from colored pencils, to markers to watercolors.
She will be joining us on Fridays for the few weeks so be sure to visit.

Here's my monster tag projects:


Today we have a special guest from Germany, Anika Lerche. She is an avid card maker and creator. You will see she has a keen eye for color and design. She uses many mediums from colored pencils, to markers to watercolors.
She will be joining us on Fridays for the few weeks so be sure to visit.

Hello, I am Anni and I’m from Germany. For 15
years now I´ve lived in the beautiful city Berlin and I am married. I work as a
math-teacher at a vocational college. Making papercrafts is a perfect balance to that.
I have been stamping since 2008, I love clean and simple cards, and yet eventually my cards often
turn out to be somewhat more complex. I love the therapy of paper piecing and resist techniques. You can see
all my projects at www.anikarten.blogspot.de.
Here's my monster tag projects:

- I die cut tags from Copic friendly paper.
- I stamped the birds with Memento ink and colored them with Copic markers. I also created a ground and a sky around them with copics.
- I choose one color for every bird/tag and left the tag monochrome.
- I die cut the sentiment from matching cardstock.
- For some contrast I added black and white twine.
Tuesday, April 12, 2016
All About Layers- Day 2 "Monster Birthday Card)
Hi Everyone!
I always feel like birthday cards for boys are little harder than ones for girls. This week I made a birthday card for boys using Happy Monster Party and layering 2 border stamps to create my background. I have to say that this one of my favorite boy birthday cards that I have created!
To create the background, I used the Three Line Border and Stitched Border stamps to create a fun plaid background. The colors for background are yellow, red, light blue, and green dye inks. I chose the colors to coordinate with the monsters. The monsters were stamped in black ink and colored in with Copic markers. Next, I cut out the frame and the monsters using the same die. The die creates both a frame and the panel so I used the both the panel piece for the monsters and the frame that it cut out of the white cardstock. I ran the die through again with the red polka dot pattern paper to create the red frame. Next, I adhered the red frame to the white cardstock frame to add a little dimension. To assemble the card, I adhered the plaid panel on my base and then my frame at an angle on top of that. Last, I placed the monsters inside the frame.
I think this card is so cute and fun to give to a boy for his birthday! I hope that you enjoyed my card this week!

I think this card is so cute and fun to give to a boy for his birthday! I hope that you enjoyed my card this week!
DeNami Supplies:
Thursday, January 28, 2016
Monster Celebration Card and Guest Blogger from Switzerland
Hi Friends,
I am excited to introduce a crafter from Switzerland today. I saw her word on Instagram and enjoy seeing her lovely projects. She will be doing several guest posts for us so stay tuned!
We asked her to share a little bit about herself so you can get to know her better. Below that is her description and project. Please welcome her!
~Nami
My name is Francine. I live in Switzerland in the wonderful Three Lakes Region with my sweetheart and our cats (I'm an animal lover!). I'm bilingual in German and French from birth. I discovered scrapbooking and cardmaking in 2009 by leafing through a book and it was love at first sight! I like playing with different styles and techniques. It depends on my mood and inspiration. bit I always love coloring rainbow and bright colors, making splatters, using stencils and blending tools, paint brushes and watercolors. I started my blog called 1001 Cartes (1001 cards) in 2011 and my YouTube Channel in 2014. I'm also sharing work in progress pictures on Instagram @francinevuilleme

Hi everyone! Francine here!
Today,
I'm super excited to share my first card with you. I'll be back the
next two Thursdays with more creations. Thanks so much to Nami for the
opportunity!
For this card, I decided to
feature the Monster
Celebrations stamp set. These monsters are TOO CUTE!
First, I colored the monsters with Copic markers and fussy cut them. To make the image pop against the
background, I kept the design simple. I chose to make tiny splatters with a spritzer
tool over a top-folded white card base. To accentuate the effect, I also
sponged a thin layer of Salty Ocean Distress ink in the center.
Next, I adhered the monsters with foam pads to the card for more
dimension. To finish off my card, I added some adhesive pearls here and
there for a festive look.
I hope you like this card! See you soon with other fun creations showcasing DeNami Designs stamp sets!


Wednesday, October 21, 2015
Monster Celebration Card
Hi Friends,
There is always occasions to celebrate so having a "Congratulations" card on hand is always a great idea. DT Val created a fun and colorful card using the Monster Celebrations clear stamp set. This is perfect for school report cards, best effort in sports, a new promotion, a new milestone...
Here's what she used to make the cards.
~~~
My card for DeNami Design today is a super bright & fun one for sending someone a Congratulations!
There is always occasions to celebrate so having a "Congratulations" card on hand is always a great idea. DT Val created a fun and colorful card using the Monster Celebrations clear stamp set. This is perfect for school report cards, best effort in sports, a new promotion, a new milestone...
Here's what she used to make the cards.
~~~
My card for DeNami Design today is a super bright & fun one for sending someone a Congratulations!
I'm using the fun Monster Celebration stamp set, and the Mini Berries stamp & Teeny Holly Berries stamp for this card.

Several Pretty Pink Posh products are also at work here: the Storybook 2 die, the Stitched Borders 3 die, the Gold Stars confetti and 6mm Silly Eyes.


I think this card will make someone smile, especially when they deserve a big Congrats!
Thank you for stopping by today, and Happy Crafting!

Tuesday, December 30, 2014
Day 2 (part 1) of DeNami's Sneak Peek Week! Sweet Monster Treats

Look how adorable and colorful these Monster treats are! I will show you how to do the one in the middle. Stay tuned and see the one on the right at noon, PST, today.

Hi Friends,
Doesn't this little picture just make you happy?? This is part of the new Monster Celebrations Clear Stamp that is going to be available January 5.
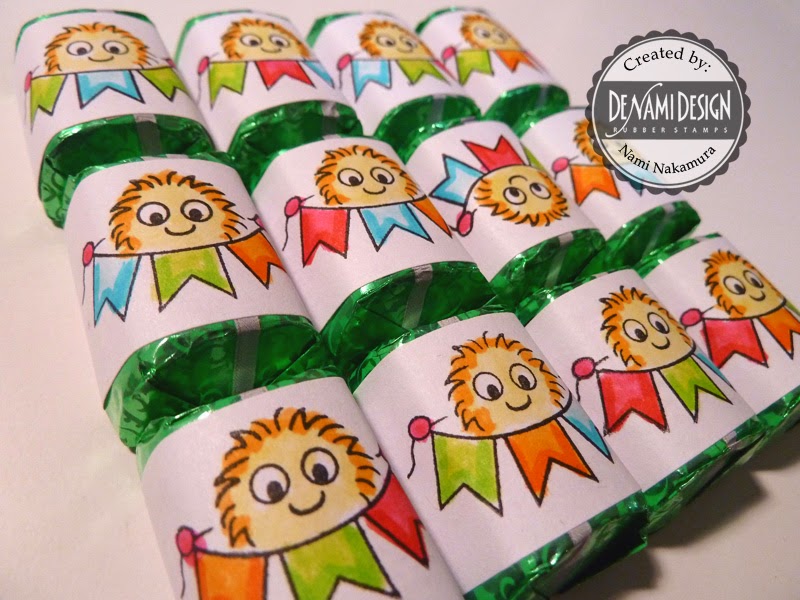
These are Hershey's Nuggets all dressed up. I chose the Chocolate Mint ones . They were simple to make, but will really put a smile on anyone's face.
Supplies needed:
CR03 Monster Celebrations Clear Stamp Set (available January 5, 2015)
Versafine Onyx Black ink pad
Markers (I used Tombows)
CB300 Boutique Box
Hershey's Nuggets (I used Chocolate Mint)
PC21 White Cardstock
White Address Labels size 1x 2 5/8 inches (found in most office supply stores)
Here is how I did it:
I stamped the 1x 2 5/8 inch address labels using the CR03 Monster Celebrations Clear Stamp set using the Versafine Onyx Black Ink Pad. 12 fit into DeNami's Boutique box. (Size 3x3x1)
The Versafine ink pad creates a crisp image and then I used Tombow markers to color in.


Once I colored them in, I wrapped it around each Hershey Nugget. It really is a perfect fit.
I then created a little center divider. It keeps the chocolates from moving around.
I cut a cardstock 3x4 and scored it widthwise. Score 1 inch in, then 1/2 inch in, 1 inch in, then 1/2 inch in, then 1 inch in again.
Stamp the Congrats and the monsters from the Monster Celebrations Clear Stamp Set on the 1/2 inch sides and do so upside down since one will appear on each side of the box and it will end up being right side up if you do it this way.

Add your desired colors to add cheer to the insert.

Add ATG adhesive to one end of the insert and fold to create a "tube" with corners.
Once done, insert a row on the nuggets facing out, then insert a row back to back facing the other side. Both sides of the box will look the same. For a variation, you can choose a different theme on each side.
This will be great for graduation party favors, a job promotion, retirement party, an award, completing a certification... You can also do a Valentine's theme for cute treats.
This is very easy and economical. We have several Boutique Boxes here to use, but you can do similar things with them. Just use your imagination.

Here's the Front

Here's the Back. They look the same, so you can do some fun things if you want to change the look. Just stamp 6 for one side and 6 for the back.

Aren't they so cute!


See that cute little one playing around?

Thanks so much for checking this out. Stay tuned and see a second blogpost at noon, PST.
If you saw the other project at the top of the blogpost, that is a sneak peek to what is coming later today.
Subscribe to:
Posts (Atom)

Follow Us

 |
 |
 |
 |
 |


